Web Sites

We came across this nasty, self-replicating virus last week that managed to insert its code into one of our customer's sites. There were no obvious signs until the customer tried setting up some Google Ads and Google's system flagged the site as being infected.
We dug around and used the Securi web site virus checking tool to help identify the issue. This showed up some of the malicious URLs that the site was being pointed to but couldn't show us exactly where in the site's code the virus was planted.
The virus is also known as WP-VCD Malware and once planted, gives hackers complete control over your site. Often it is used to redirect traffic to other sites and send spam e-mails.
Here is how we cleared the virus from the infected site:
- Deleted all theme folders in wp-content/themes which were not being used by the site, leaving just the one folder for the site's theme
- In that folder e.g. wp-content/themes/twentytwenty - we checked the 'functions.php' and removed the malicious code
- In the 'wp-includes' folder deleted 'wp-tmp.php' and 'wp-feed.php'
- Logged into WordPress and performed a full update of WordPress, all plugins and themes
- Installed a virus scanner and firewall (we used the free version of WordFence)
- Changed the cPanel password to the account
- Changed the WordPress password for all users
Please note that if you have more than one instance of WordPress installed on the same hosting account then it is likely that these additional sites are also infected, too.
This is a nasty virus but hopefully this guide will help. If you're still having problems though, please get in touch.
We recently had an issue when trying to log into the admin area of a WordPress site.
The log in box would appear but when we went to log in, this error message was displayed: The requested URL /wp-login.php was not found on this server
After searching around on the internet and trying a few solutions, we started trying disabling plugins to see if one of these was causing the issue. We did this by renaming one plugin folder at a time, located in /wp-content/plugins
The plugin which was causing our site issues was the 'Automatic Domain Changer' plugin. We simply renamed the plugin's folder and then tried logging in again. Everything was back to normal.
When updating Joomla you may see a pop-up error message with the title 'Error' and the message 'Invalid Login'.
If you see this message on your screen, one of the most likely causes is lack of disk space on your hosting account.
When updating, Joomla requires a certain amount of disk space to write the new files to and if the space is not available, you may receive the 'invalid login' error.
If you would like to redirect visitors to your web site from the non-www version (e.g. hostingmatters.co.uk) to the www version (www.hostingmatters.co.uk) whilst also redirecting them to the https version of the site, then you can do so using this addition to your htaccess file:
RewriteCond %{HTTPS} !on [OR]
RewriteCond %{HTTP_HOST} !^www\.
RewriteRule (.*) https://www.hostingmatters.co.uk%{REQUEST_URI} [L,R=301]
Simply copy and paste these lines to the top of your htaccess file and then replace 'hostingmatters.co.uk' with your web site's own address.
This will redirect visitors trying to go to:
to
https://www.example.com
When a customer makes an online order through your Virtuemart store, they may receive an invoice with a duplicate shop name, vendor name or other details at the bottom.
To resolve this you will need to edit the mail_html_footer.php file in your installation. To do this, follow these steps:
- Make a copy of the file components/com_virtuemart/views/invoice/tmpl/mail_html_footer.php in your installation and rename it to mail_html_footer.php@backup
- Edit the original file components/com_virtuemart/views/invoice/tmpl/mail_html_footer.php
- Around line 38 you will see the code:
echo $this->vendor->vendor_name .'<br />'.$this->vendor->vendor_phone .' '.$this->vendor->vendor_store_name .'<br /> '.$this->vendor->vendor_store_desc.'<br />'; - Place a comment marker before this so the code is now:
//* echo $this->vendor->vendor_name .'<br />'.$this->vendor->vendor_phone .' '.$this->vendor->vendor_store_name .'<br /> '.$this->vendor->vendor_store_desc.'<br />'; - Save the file
- Now do a test order on your shop to check that the customer invoice is now displaying as expected.
One of the most common and annoying issues with WordPress is that when you paste text into a page from another program, e.g. Microsoft Word, WordPress lumps all of the text together into one long string - it doesn't put the paragraph breaks into the text.
You may see the breaks in page editor but when you view the actual page on your web site, the text is all lumped together.
To get round this, we use the TinyMCE text editor plugin. All you need to do is:
- Go to https://en-gb.wordpress.org/plugins/tinymce-advanced/ and download the plugin
- Log into the backend of your WordPress web site and then click on 'Plugins' | 'Add New'
- Once the plugin has been installed, go to 'Plugins' and then click on 'Settings' under 'TinyMCE Advanced'
- On this page ensure that 'Keep paragraph tags' is ticked
- Click on 'Save Changes' and now when you paste text into a page, the paragraphs will remain in place.
It is possible to display Joomla modules in a Virtuemart's product page, simply follow these steps:
- First, create your module in Joomla in the normal way and set the 'Module Position' to 'virtuemart-product' or anything of your choice
- Now, go to the Virtuemart product ('Virtuemart' | 'Products') and click on the product that you would like to display the module
- Click on the 'Product Description' tab
- In the 'Product Description' area, paste the code below ensuring that 'virtuemart-product' is replaced with the name of the position module that you used in step 1
- : {loadposition virtuemart-product}
- Save the product page and now view the site in your browser. The module should display on the product's page
WordPress is a great platform to host your web site but like every other CMS out there, it has a few minor issues which can become really frustrating. One of those is when you hit the 'enter' key and a paragraph is created in the editor but when you view the web site, all of your text is on online line i.e. paragraphs have not been created.
To fix this issue, follow these steps:
- In the backend of your site go to 'Dashboard' | 'Settings' | 'Writing'
- Enable the setting: Formatting - WordPress should correct invalidly nested XHTML automatically
“save changes”
If you are using the TinyMCE text editor, follow these steps:
- In the backend of your site go to 'Dashboard' | 'Settings' | 'TinyMCE Advanced'
- Enable the setting 'Keep paragraph tags'
Now go back to the page that you were editing, save it and paragraphs should appear.
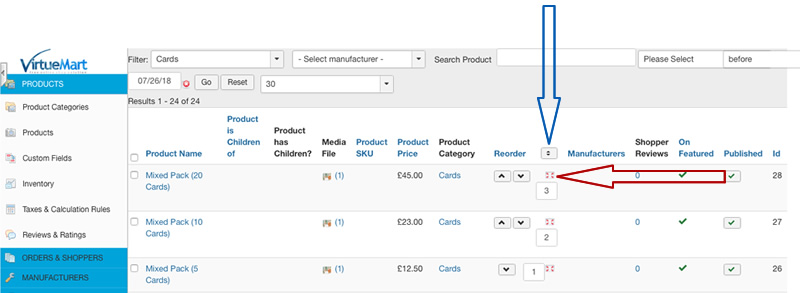
By default, Virtuemart lists products in category view in the reverse order that you created them i.e. the most recently created product will be displayed first.
If you would like to products in a particular order, simply follow these steps:
- Log into the backend of your web site and click on 'Virtuemart' | 'Products'
- A list of all of the products in your site will be listed
- At the top of the page is the 'Filter' drop-down menu. Use this to select the category of products that you would like to change the order of
- Once done, the page will refresh to only show products in this category
- Beside each product is a grey square with red corners (red arrow). Click on this and whilst holding down the mouse button, drag the product up or down the list
- Do the same with each product until the products are in the order you want them to be
- Once done, click on the 'Save Order' button (blue arrow) to save the order of your products
After upgrading your Joomla site, you may get the error message 'joomla error 1054 unknown column 'client_id' in 'where clause'' in the backend of your site. The error usually means that although you can log into the backend of your site e.g. www.your-site.co.uk/administrator - you do not see the usual control panel and instead it's an almost or completely blank screen.
To resolve this issue you need to run an SQL query. Log into your hosting control panel and in PHPMyAdmin run the following ensuring that you replace 'wapjc' with the prefix of your database tables:
ALTER TABLE `wapjc_menu_types` ADD COLUMN `client_id` int(11) NOT NULL DEFAULT 0;
UPDATE `wapjc_menu` SET `published` = 1 WHERE `menutype` = 'main' OR `menutype` = 'menu';
Once done, your should now be able to log into the backend of your Joomla site again.
If you are having issues, please get in touch and our team will be happy to help.
In this article we explained how to redirect all traffic on your web site from non-www to www URLs. In this article, we do the reverse and explain how to redirect traffic from www to non-www URLs.
To do this, simply open your .htaccess file and add in the lines:
RewriteEngine OnRewriteCond %{HTTP_HOST} ^www.yourdomain.com [NC]RewriteRule ^(.*)$ http://yourdomain.com/$1 [L,R=301]
Ensure that you replace 'yourdomain.com' with your actual domain name.
Once done, save the file and go to your web site and you should now be redirected to the non-www URL.
Adding your web site to Google's Webmaster Tools is a useful an important step when launching your web site. Not only will it help you climb the search engine rankings by allowing you to submit your sitemap and give you pointers on where you can improve your site, it will also alert you, via e-mail, in the event of your site being hacked or compromised.
Adding your site is usually very easy. You just log into your Webmaster Tools account, click on 'Add a Property' and then verify ownership of the site. The easiest way to do this is download the file that Google provide you and then upload this to the root of your web site.
99% of the time this works with Joomla sites but sometimes this method and HTML tag method does not. There are other ways to verify ownership of the domain, such as adding a C record to your domain's DNS settings but there is an easier way.
If you have a Joomla site and the normal verification methods are not working, we suggest installing the Webmaster Site Verification plugin. It is really simple to install and then you just copy / paste your Google authentication code into the plugin, save and then Google will recognise it and authenticate ownership. It also has options for other web sites as well, such as Bing, so if you are going to submit your site to a number of search engines or directories, this could be a much quicker method.
As always, if you are having issues then please just get in touch with us and we will be happy to help.
When upgrading your Joomla based site to version 3.8 (or above) you can sometimes get the error: 'Call to undefined method JApplicationSite::isClient()'
This appears to have affected quite a few Joomla users.
In order to fix this, try taking the following steps:
- Log into your hosting control panel and go to the file browser
- Rename the folder in the root of your Joomla directory from 'libraries' to 'libraries_old'
- Upload the 'libraries' folder from a fresh Joomla installation package
- Test your site
This should resolve the issue temporarily. Now try updating all of your sites components, modules and plugins.
Test your site fully to make sure it is functioning as normal.
This error happens quite often if you upgrade your version of Joomla.
Once the upgrade completes, the admin area page is white, with nothing else displayed. It is quite often the case that the frontend (public) part of the web site is working as normal.
The issue is usually caused by an out-of-date or incompatible admin component or module. To see which one is causing the issue on your site go into your hosting control panel and use the file / directory browser and navigate to your 'public_html/administrator/ folder and open the 'error.log' file.
This should give you a clue as to what is causing the issue, showing you the path to the component or module in your admin area. Once you have identified the issue, simply rename the component or module's folder to something else and then try reloading the admin area of your Joomla site.
If the admin area loads as normal, you have found the problem. You can now decide to see if there is an update to the component / module or uninstall it completely.
If this didn't work for you, please get in touch and we will be happy to take a look for you.
There are a number of steps to obtaining, installing and configuring a SSL certificate for your Joomla site but it is much easier than you may think.
The first step is to obtain a SSL certificate and have it installed on your hosting account. We now offer free SSL certificates so if you are hosting your site with us, please get in touch and we can get one for you. We can also install it on your Joomla site for you are not comfortable doing it yourself.
If you are ready to give it a go yourself, here's what you need to do:
- Once your hosting provider has issued the certificate and installed it on your account log into the backend of your Joomla site
- Click on 'System' from the top menu and then click on 'Global Configuration' from the drop-down menu
- Once the page has loaded, click on the 'Server' tab
- Here you will see an option called 'Force HTTPS'. Select 'Entire Site' from the drop-down menu and then click the 'Save & Close' button
- Next, in your web hosting control panel navigate to your file / folder viewer and edit your '.htaccess' file. Once open, copy / paste the following into the top of the file and then save the file:
RewriteEngine On
RewriteCond %{SERVER_PORT} 80
RewriteCond %{HTTP_HOST} ^(www\.)?coolexample\.com
RewriteRule ^(.*)$ https://www.coolexample.com/$1 [R,L]
Finally, replace 'coolexample.com' in the example, in both places, with your domain name. For example:
RewriteEngine On
RewriteCond %{SERVER_PORT} 80
RewriteCond %{HTTP_HOST} ^(www\.)?hostingmatters\.co.uk
RewriteRule ^(.*)$ https://www.hostingmatters.co.uk/$1 [R,L]
This error can be thrown up following a Joomla update. We have experienced it a couple of times with different customers and each time, the following fix has worked for us:
You may be getting a white screen with no menu items in the backend of your site. If so, skip to 'method two' below. If you are able to access you administration area and all of the menus, follow these steps:
-
In the administration area go to 'Extensions' | 'Manage' | 'Database' | Fix'
-
Then go to 'Components' | 'Joomla Update' and 'Resinstall core files'
-
Run the database fix again.
This should clear up the error for you.
Method two
If you do not have access to the administration area menus, try running the database fix by entering the URL to directly access it. To do this, copy / paste the URL below into your browser but replace www.example.com with your web site's address
Press enter and then the database fix tool should run and your database should be repaired, allowing you to access the administration area as normal.
Not worked for you? Get in touch and we will take a look for you.
When you have your Virtuemart shop set up in Joomla, you may want to remove the two drop-down options from the category view in the frontend of your shop. Unfortunately Virtuemart does not have a setting to remove these options so you need to change the code a little but thankfully, it is very simple.
To make the change, follow these steps:
- Connect to your site via FTP or file the file in your cPanel: ROOT/templates/<yourjoomlatemplate>/html/com_virtuemart/category/default.php
- Find the lines:
- <?php echo $this->orderByList['orderby']; ?>
- <?php echo $this->orderByList['manufacturer']; ?>
- Delete both lines and save the file - uploading it back up to your web site if necessary
Now go to the frontend of your Virtuemart web site, browse a category page and the options will have been removed.
If you have any problems with this or need any help with your hosting, please get in touch and we'd be happy to help.
There are a number of causes to your Joomla web site having a 'Fatal error: Out of memory' issue.
One of the ways that we have solved this in the past is to use a different .htaccess file in the root of your web site. This does not work for all 'Fatal error: Out of memory' issues but if other techniques have failed, this is worth a try:
- Log into your hosting control panel or connect to your site via FTP and in the root of your web site directory, rename your '.htaccess' file to '.htaccess@orig' - that way we can restore it if needed
- Now, you may already have another file in the root of your web site called 'htaccess.txt'. If you do, simply rename this to '.htaccess' and then test your site again to see if it now works
- If you do not already have a 'htaccess.txt' file there, you can download the latest version of Joomla from the official site, extract the contents of the download and use the 'htaccess.txt' file in there and upload this to your web site and then rename it to '.htaccess'
Hopefully this will work for you but if not, please get in touch with our support team and we will be happy to help.
It is possible to link your 'terms of service' text on the checkout page of Virtuemart to a Joomla article, instead of using the built in 'terms of service' pop-up. To do this, follow these steps:
- Edit the file components/com_virtuemart/language/en-GB/en-GB.com_virtuemart.ini
- Search for the line that contains “COM_VIRTUEMART_CART_TOS_READ_AND_ACCEPTED”
- Change it to:
- COM_VIRTUEMART_CART_TOS_READ_AND_ACCEPTED="<a href=http://www.your-domain.co.uk/terms-and-conditions target=”_new”>Click here to read terms of service and check the box to accept them.</a>"
- Make sure you replace 'http://www.your-domain.co.uk/terms-and-conditions' with the link to your terms and conditions page
- Save and upload the file, replacing the existing 'en-GB.com_virtuemart.ini' file
- Now go to the frontend of your web site, add something to the cart and then go to the checkout page to make sure the change has worked
In this article we will explain how to uninstall Virtuemart from your Joomla web site. If you have any issues, please contact our support team and they can take care of the removal for you.
If you are going to do this yourself, please ensure you have a full backup of your site before starting just-in-case something goes wrong.
- First, log into the backend of your web site by going to www.your-web-site.co.uk/administrator (replacing your-web-site.co.uk with your site's URL)
- Now click on 'Extensions' from the main menu at the top of the page and then click on 'Manage' | 'Manage'
- In the search box at the top of the page, type in 'vm' and then click on the search button
- The page will reload with all of the Virtuemart plugins. Select all of these and then click on the 'Uninstall' button
- The page will refresh. Now type 'vir' in the search box and click on the search button. Select all of these and then click on the 'Uninstall' button
- The page will refresh again. Finally, type in 'tcpdf' in the search box and click on the search button. Select all of these and then click on the 'Uninstall' button
If you have loaded your web site in your browser and the URL is being displayed as example.co.uk rather than www.example.co.uk, you can add a bit of code to your htaccess file to redirect all users to the www. address.
To do this, add the following lines to your .htaccess file:
RewriteEngine On
RewriteCond %{HTTP_HOST} !^www\. [NC]
RewriteRule ^(.*)$ http://www.%{HTTP_HOST}/$1 [R=301,L]